
Scoring
When you start a new game you can choose whether you want to play according to area or territory scoring rules (sometimes also known as Chinese or Japanese rules). Because the scoring rules may affect decisions how to play, you are not allowed to change the scoring rules in the middle of the game.
Typically you select the scoring system in the “New Game” screen by selecting a ruleset. The IGS (Pandanet) and the Japanese rulesets use territory scoring, all the other rulesets use area scoring. You can also manually choose the scoring system in the “New Game” screen, under “Advanced Settings”.
The default ruleset “Little Go” uses area scoring. Read on why this is important.
The reason why area scoring is the default is that the computer player (Fuego) does not properly support territory scoring. This can be felt towards the end game when the computer engine sometimes makes unnecessary moves:
- Under territory scoring rules, each stone placed inside your own territory is a lost point because it makes your territory smaller. Each stone placed into your opponent’s territory is also a lost point because it gives your opponent an additional prisoner.
- Under area scoring rules, both types of play are neutral: A stone placed inside your own territory makes your territory smaller, but it also gives you a point for the stone itself. A stone placed inside your opponent’s territory is not relevant because under area scoring rules prisoners do not count.
The bottom line is that under territory scoring rules the computer player may lose a game that it would have won under area scoring rules. In some cases the computer player may even resign because its automated territory scoring calculations are incorrect.
Here is a summary of how the two scoring systems work:
- Area scoring. In this scoring system a player’s score is calculated as follows:
- The number of empty points which only the player’s stones surround.
- Plus the number of the player’s stones on the board.
- Territory scoring. In this scoring system a player’s score is calculated as follows:
- The number of empty points which only the player’s stones surround.
- Minus the number of empty points surrounded in seki.
- Minus the number of the player’s stones that have been killed (whether captured during the game, or removed from the board as dead stones at the end of the game).
- Add compensation to white’s score:
- Komi is added to white’s score in both scoring systems. As a reminder: komi is white’s compensation for black’s advantage of having the first move.
- Only when area scoring is in effect and it is a handicap game: The number of handicap stones is added to white’s score to compensate for the value that black would receive if the handicap stones were still on the board. In essence, black already received a huge strategic advantage from the free handicap stones and should not benefit a second time from the value of the stones on the board.
It is beyond the scope of this manual to explain the finer details that arise from the differences between the two scoring systems. Here are just two key points:
- When area scoring is in effect a player can place a stone in their own territory without negatively impacting their own score, whereas when territory scoring is in effect a stone placed within a player’s territory reduces that player’s score by 1.
- When area scoring is in effect, placing a stone in neutral territory adds 1 point to the player’s score, whereas when territory scoring is in effect a stone placed into neutral territory has no effect on the player’s score.
The best way to find out more about the two scoring systems is to practice and play a few games. For the nitty gritty details it is recommended to check out Sensei’s Library.
Whenever you want to view the current score, you tap the Game Info button, then you select the “Score” segment.
As shown in the following images, the table displays different entries depending on the scoring system that is in effect for the current game. Refer to the previous section to find the meaning of each entry.
Table entries when area scoring is in effect:
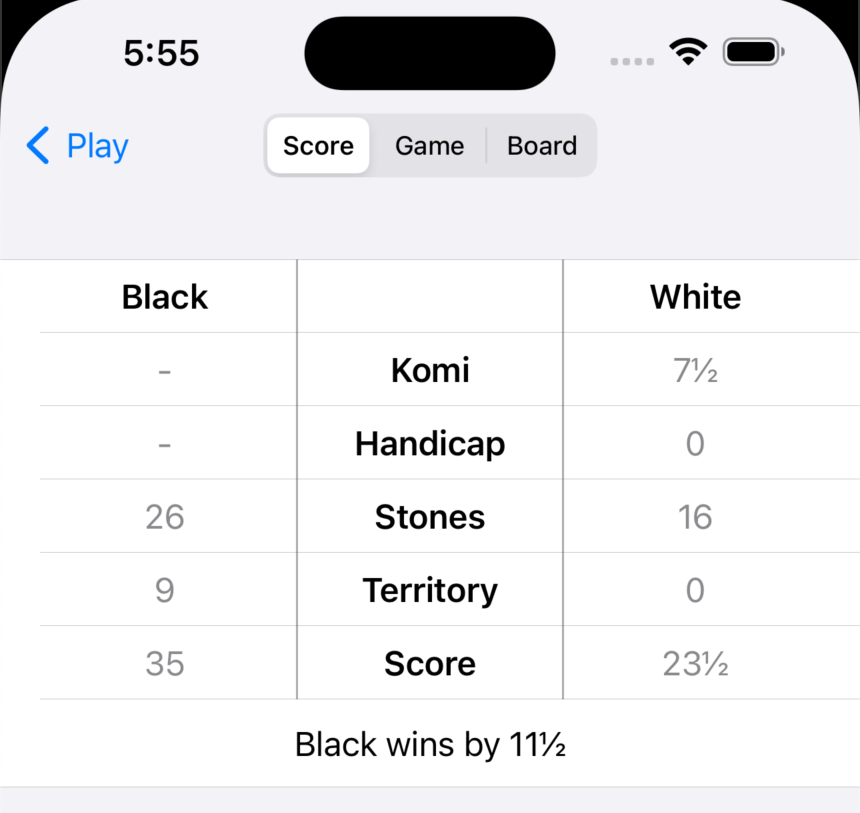
Table entries when territory scoring is in effect:

If you view the score while the game is still in progress, you will notice that some of the scoring table rows show “n/a” instead of numbers, and that the final score therefore is not meaningful. The reason for this is that, unfortunately, Little Go is not very smart about calculating the score - it relies quite heavily on your help with evaluating which stones on the board are alive, which ones are dead and which ones are in seki. To provide this help you have to activate Scoring mode.
To activate Scoring mode, tap the Menu button, then select the “Score” item from the menu that pops up.
Scoring mode can be activated at any time during normal game play, and it will activate automatically when the game ends after two or three consecutive pass moves. Automatic activation can be turned off in the Settings area of the app under “Scoring > Auto scoring / resuming play”. Automatic activation never happens if a player resigns, because in that situation the other player automatically wins and the score is not relevant. If you want you can manually activate Scoring mode even if a player resigned.
While Scoring mode is active you cannot play moves or perform any other actions that influence the game state (exceptions are loading a game from the archive, or starting a new game).
To leave Scoring mode you simply tap the Play button. This will return you to Play mode.
When you return to Play mode and the game has not yet ended, you simply continue playing. If you want to re-activate Scoring mode you can do so by again selecting the “Score” item from the menu that pops up when you tap the Menu button (as explained in the previous section).
When you return to Play mode and the game has ended, you cannot make any moves, so the usual Pass button and Computer Play button are not displayed. In their, place, you will now see a Scoring button that you can tap to re-activate Scoring mode. Tapping the button is faster than if you had to call up the menu, and because the Scoring button and the Play button are shown in the same location, they allow you to quickly toggle between Scoring mode and Play mode.
When Scoring mode becomes active, the app takes a moment while trying to find suggestions for an initial set of dead stones. This feature is optional and can be turned off in the Settings area of the app under “Scoring > Find dead stones”.
After the initial set of dead stones is determined, the board is divided up into what Little Go thinks are black and white territories:
- Black’s territory is marked using a blackish translucent overlay.
- White’s territory is marked using a whitish translucent overlay.
- Neutral territory is not marked at all.
- “Inconsistent” territory (see further down) is marked with a red dot symbol.

You can now tap a stone to mark it (and its group) as being dead. Territory coloring is immediately updated to display the new state. Note that the stones you marked as being dead are displayed with a small red “x” in the center. Stones marked as dead can be “unmarked” by tapping them again, thus turning them back to alive status.
Whenever you change the dead/alive state of one or more stones, the updated total score is displayed in the Status Text. To view the updated detail score you can display the Game Info screen.
If you have a game with many small stone groups that are all dead, marking them will quickly become tedious. You can get a bit of assistance by turning on an option in the Settings area of the app under “Scoring > Mark dead stones intelligently”.
From now on, whenever you toggle the dead/alive status of a stone group, Little Go will help you by automatically toggling adjacent stone groups of the same color to the same dead/alive status.
Tap the Menu button, then select the “Start marking as seki” item from the menu that pops up. From now on tapping stones no longer marks them as dead or alive, instead it marks them as being in seki. Stones in seki are displayed with a whitish rectangle. Stones marked as being in seki can be “unmarked” by tapping on them again, thus turning them back to alive status.
Revert to marking dead stones by tapping the Menu button and selecting the “Start marking as dead” item from the menu that pops up.
NoteMarking stones as in seki is mainly intended to be used when territory scoring is in use. In that case, stones marked as in seki are treated as neutral territory, hence they do not count towards either player’s score.
If area scoring is in use, stones in seki are counted as if they were marked alive. So even though marking stones as in seki is still possible with area scoring, it really does not make much sense.
When the app finds an empty territory where the state of adjacent dead or seki stone groups is inconsistent, it will mark that territory in a special way (a red dot symbol by default). The definition of “inconsistent” is:
- There are dead stone groups for both black and white.
- Or there are both dead and alive stone groups of the same color.
- Or there are both seki and non-seki stone groups in any color combination (effectively, seki stone groups must always be surrounded entirely by alive stone groups of the opposing color, except where they share neutral territory with other seki stone groups).
The reason for marking up inconsistent territory is to give you notice that a stone group has probably been erroneously marked as dead, alive or in seki.
NoteOften inconsistent territory is just a transient state while you are marking several stone groups and are on the way to a consistent state. Just ignore the markup when this is the case.
If you don’t like the “red dot symbol” way to mark inconsistencies, you can change the markup type in the Settings area of the app under “Scoring > Inconsistent territory”. The option “Neutral” causes inconsistent territories to be marked as if they were neutral territories, in other words: not at all.
NoteFor the purpose of calculating the score, inconsistent territory always counts as neutral territory. This is regardless of how inconsistencies are marked up.