You can place various types of graphical elements on the board to point out noteworthy stones or figures. These graphical elements are summarily called “markup”. One typical usage is to combine markup elements with a short and/or long description annotation text (see the Annotations section of this manual) that further explains the meaning of the markup elements.
Every game tree node contains its own set of markup elements, independently from any markup that might be present in other nodes.
To place new markup or modify/remove existing markup you need to switch to Markup editing mode by selecting the entry “Edit markup” from the menu that pops up when you tap the Menu button.
The app does not draw markup when it is in Scoring mode or in Board setup mode because in those modes the board needs to show other elements that are important for the mode.
Markup elements
All markup elements at a glance
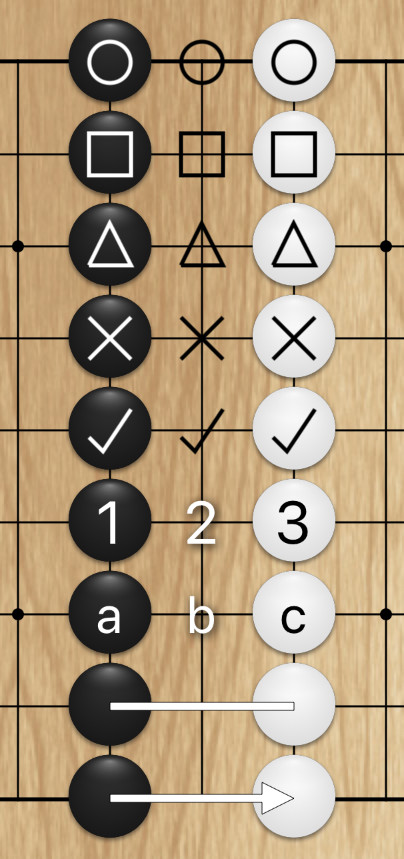
Here is an illustration of all markup elements that are supported by the app, and how they are rendered.
All markup elements at a glance
From the top, these are the markup elements shown in the illustration:
Symbols
Circle symbol
Square symbol
Triangle symbol
“X” symbol
“Selected” symbol (checkmark style)
Markers
Number marker
Letter marker
Connections
Line
Arrow
Not shown are labels because they are more or less the same as markers, except they are not constrained to a single digit or letter.
Symbols
You use symbols to mark up a single intersection on the board. There are 5 different symbol types:
Circle
Square
Triangle
The “X” symbol (“X marks the spot”)
The “Selected” symbol. Use this symbol to indicate that something is selected.
The “Selected” symbol can be rendered with a Dot symbol or with a Checkmark symbol. You can select which rendering style to use in the Settings area of the app under “Markup > ‘Selected’ symbol style”. The default is the Dot symbol style.
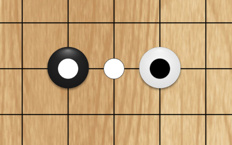
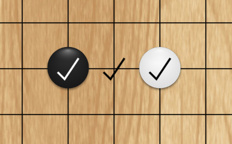
Here is how the two styles are rendered in the app:
Selected symbol, dot style
Selected symbol, checkmark style
Connections
You use markup in this category to draw a connection between two intersections on the board: A start intersection and an end intersection. There are 2 different connection types:
Arrow. This is a connection where the direction from start to end is rendered with an arrow head.
Line. This is a connection where the direction from start to end is not visibly rendered. Note that even though you don’t see the direction of lines, the start-end direction still exists in the background model data.
Markers
You use markers to mark up a single intersection on the board. Markers are, in effect, very short labels that consist of only a single character. There are 2 different marker types:
Number marker. A number marker is a label that consists of a single digit character in the range 1-9.
Letter marker. A letter marker is a label that consists of a single lowercase or uppercase letter from the latin alphabet, i.e. a-z, A-Z.
On devices with smaller screens markers may not be shown when a 19x19 board is displayed fully zoomed out. To see any markers/labels that you are missing you have to zoom the board.
Labels
You use labels to mark up a single intersection on the board. A label consists of an arbitrary length text without any newlines. Although there is no length limit, in practice you should keep label texts as short as possible - drawing multi-word labels on the board is not what you usually want.
A typical use case for labels is if you want to use different characters than the ones offered by number or letter markers.
On devices with smaller screens labels may not be shown when a 19x19 board is displayed fully zoomed out. To see any markers/labels that you are missing you have to zoom the board.
Markup user interface
When you switch to Markup editing mode the following user interface elements become available:
Markup user interface
The Play Mode button. Tapping this button leaves Markup editing mode and instead activates Play mode.
The Select Markup Type button. Tapping this button pops up a menu that lets you choose what kind of markup you want to place from now on when you interact with the board. The popup menu also contains an Eraser item which when selected lets you delete selected existing markup. The icon used for the button is variable and reflects which markup type is currently selected. In the illustration the button uses the Triangle symbol icon which means that interacting with the board will place a Triangle symbol.
The Discard all Markup button. This button is displayed only if there is at least one piece of markup present. Tapping the button discards all markup.
The Status Text area shows either instructions how to place the currently selected type of markup, or continuous feedback about an ongoing interaction (e.g. while you are drawing an arrow).
Interactions
One markup element per intersection
A general rule that is important to remember is this: You can mark up an intersection with only one of symbol, marker or label.
Placing a new symbol, marker or label, or moving an existing symbol, marker or label to an intersection that already is marked up with a symbol, marker or label, replaces that markup.
Connections work slightly different: Because connections affect two intersections, the rule here is that there may be no two connections (regardless of type) that have the same start/end intersections.
Drag & Drop
When any markup type except Eraser is selected you can move a markup element simply by dragging it. The markup element is placed on the intersection where you lift your finger.
When you drag a symbol, marker or label to an intersection that is already marked up with a symbol, marker or label, the markup at the destination is replaced by the markup that was dragged.
When you drag a connection endpoint, the endpoint is moved to the intersection where you lift your finger. If this results in a duplicate connection, the connection whose endpoint you drag overwrites the connection whose endpoint already existed on the intersection where you lift your finger.
You cannot drag connection endpoints while one of the 2 connection markup types is active, because then the drag gesture is reserved for placing new connections. To drag a connection endpoint you have to select one of the other markup types.
If you start a drag operation on an intersection that has both a connection endpoint and a symbol, marker or label, then the drag operation first moves the symbol, marker or label. You can move the connection endpoint only when there is no symbol, marker or label on the same intersection as the connection endpoint.
If you start a drag operation on an intersection that has multiple connection endpoints, then the drag operation moves the connection endpoint that it finds first in the background model data.
Placing a symbol
This section describes the interactions used to place a symbol while one of the five Symbol markup types is selected ( ).
Connections and symbols can co-exist on the same intersection. An intersection on which a connection starts or ends therefore counts as free for the purposes of symbol placement.
When you tap on a free intersection a new symbol of the currently selected markup type is placed on the intersection.
When you tap on an intersection that is already marked up with a marker or label, the existing marker or label is replaced with a new symbol of the currently selected markup type.
When you tap on an intersection that is already marked up with a symbol, the app replaces the existing symbol with the next symbol in order. The order in which the app cycles through symbols is this:
Circle
Square
Triangle
“X” symbol
“Selected” symbol
When the cycle reaches the symbol of the currently selected markup type, the markup is cleared instead. Since the intersection is now free, the next tap places a symbol of the currently selected markup type.
Although this textual explanation may sound complicated, the cycling effect is actually very simple and intuitive and is designed to help you quickly find the right symbol without having to switch to a different markup type all the time. Continue to read the following examples, or just try it out.
When the Square markup type is selected and you tap 6 times in a row on an intersection that is initially free, the result is this cycle:
Square . Because the intersection is initially free the cycle begins with the symbol of the currently selected markup type .
Triangle
“X” symbol
“Selected” symbol
Circle
Clear. Just before the cycle reaches the currently selected markup type , the markup is cleared instead. Because the cycle started with the currently selected markup type , the clear takes place after all 5 symbols have been cycled through.
When the Square markup type is selected and you tap 6 times in a row on an intersection that is initially marked up with a Triangle symbol, the result is this cycle:
“X” symbol . This is the next symbol after the one that initially is on the intersection.
“Selected” symbol
Circle
Clear. Just before the cycle reaches the currently selected markup type , the markup is cleared instead. Because the cycle did not start with the currently selected markup type , the clear already takes place after only 3 symbols have been cycled through.
Square
Triangle
Placing a marker
This section describes the interactions used to place a marker while one of the two Marker markup types is selected ( ).
Connections and markers can co-exist on the same intersection. An intersection on which a connection starts or ends therefore counts as free for the purposes of marker placement.
When you tap on a free intersection a new marker of the selected markup type is placed on the intersection. The app uses the lowest next free number or letter, starting with 1 / lowercase a, then continuing for numbers to 9, and for letters from a-Z, then from A-Z.
The “lowest next free number or letter” algorithm fills gaps in the numbering / lettering. For instance, if there are already number markers for 1, 2, and 4, then the next number marker placed will be 3, not 5. Similarly, if there are already letter markers a, b and d, then the next letter marker placed will be c, not e.
You can turn off this gap filling mechanism in the Settings area of the app under “Markup > Fill marker gaps”.
When you tap on an intersection that is already marked up:
If the existing markup is a marker that has the same type as the marker you are about to place, then the existing marker is replaced and the new marker uses the lowest next free number or letter as explained above. The existing marker’s number or letter does not count as “free”.
If the existing markup is a symbol, label, or marker of the other type than the one you are about to place, then the existing symbol, label, or marker of the other type, is cleared first and the tap places a new marker of the selected markup type, just as if the intersection had been free.
Placing a label
This section describes the interactions used to place a label while the Label markup type is selected ().
Connections and labels can co-exist on the same intersection. An intersection on which a connection starts or ends therefore counts as free for the purposes of label placement.
When you tap on a free intersection the app displays a popup that lets you enter the label text. The text you enter cannot contain any newlines (any newlines you attempt to enter are converted to a space character) but can be of any length. Despite there being no length limit, you should keep label texts as short as possible. If you cancel the text entry popup then no label is placed.
If the text you enter is a single digit or letter that satisfies the criteria of a number or letter marker, the app converts the label to a marker.
When you tap on an intersection that is already marked up:
If the existing markup is a label or marker, then the app displays a popup as explained above, but the existing label or marker text is used as the default text.
If the existing markup is a symbol, then the existing symbol is cleared first and the tap behaves as if the intersection had been free.
Placing a connection
This section describes the interactions used to place a connecton while one of the two Connection markup types is selected ( ).
Connections and symbols, markers or labels can co-exist on the same intersection. An intersection on which a symbol, marker or label exists therefore counts as free for the purposes of connection placement.
Connections have a start intersection and an end intersection.
You place a new connection of the selected type by dragging from a start intersection to an end intersection. The start and end intersecions must be different - the app draws a single-intersection connection as a stub (for arrows this is just the arrow head) while you are dragging, but if you end the drag operation while still only one intersection is involved the app will not place the connection.
You can place multiple connections that originate from the same intersection as long as they end on different intersections. If you place a new connection and another connection already exists between the same start/end points as the new connection, the new connection replaces the existing one (regardless of whether the existing connection is of the same or of a different type as the new connection).
While one of the Connection markup types is selected you cannot move any kind of markup by dragging, because the drag gesture is reserved for placing new connections.
When you tap the start or end intersection of an existing connection, the app deletes that connection. If you tap an intersection that is the start or end intersection of multiple connections, the app deletes the connection that it finds first in the background model data. To delete all connections that start or end on an intersection, repeatedly tap the intersection.
You can turn off deletion of connections by tapping in the Settings area of the app under “Markup > Connection tool allows delete”. Turning the setting off can be useful if you find yourself accidentally deleting connections instead of placing new ones.
Removing markup
This section describes the interactions used to remove markup while the Eraser tool is selected.
When you tap an intersection that is marked up, the app deletes the markup on the intersection. If there are multiple markup elements on the intersection, all of them are deleted.
Dragging allows you to select a rectangular area in which to delete markup. When you complete the drag operation the app deletes all markup elements from all intersection in the selection rectangle.
Settings
There are a few additional markup-related settings which have not been discussed elsewhere on this page.
Markup precedence
Although it does not make much sense, the SGF standard allows SGF files to have both a symbol and a label on the same intersection. When you load such an SGF file, the app will draw either the symbol or the label, but not both.
By default the app will draw the symbol, but you change this in the Settings area of the app under “Markup > Markup precedence”.
Unique symbols
Normally when any of the Symbol markup types is selected you can place the same symbol multiple times, e.g. by tapping on multiple free intersections.When you enable the “Markup > Unique symbols” option in the Settings area of the app, you can no longer place the same symbol multiple times. Instead on every tap the app chooses a different symbol for you that is unique on the board. When all symbols are on the board you cannot place symbols anymore.
When no symbols are on the board, the Square markup type is selected, and you tap 6 times on different intersections, then 5 symbols are placed in this order: Square , Triangle , “X” symbol , “Selected” symbol , Circle . The 6th tap then does nothing anymore because all symbols are already on the board.
Having the “Markup > Unique symbols” setting enabled can be convenient to save a couple of taps if you frequently mark up multiple intersections on the same board position, but want to use a different symbol on each intersection.
Mapping to SGF properties
For the technically inclined, here is how each markup type maps to properties defined by the SGF standard.